

Overview
Installing Zamp on your Rillet account is easy, with most settings living in the Zamp Connector application. Follow this guide to install and configure.Prerequisites
To install the Zamp integration, you will need access to:Installation Process
Connecting the Integration
1
Log into your Rillet Account
You will need access to install integrations and generate Rillet API keys within your Organization Settings
2
Generate a Rillet API Key
- Navigate to Organization settings
- Click API Access, and click Create API key
- Name the API key like Zamp - Sandbox (if testing) and Zamp - Production
- Do not check the Read-only box
- Ensure you are copying the API key generated on the next screen, and saving it locally in a secure vault
3
Logging in and configuring the Zamp Connector Application
- Either through the Rillet integrations page, or directly from the Zamp Connector URL
- Once you enter your credentials and click Login, you should see the Zamp Tax Settings page 1.
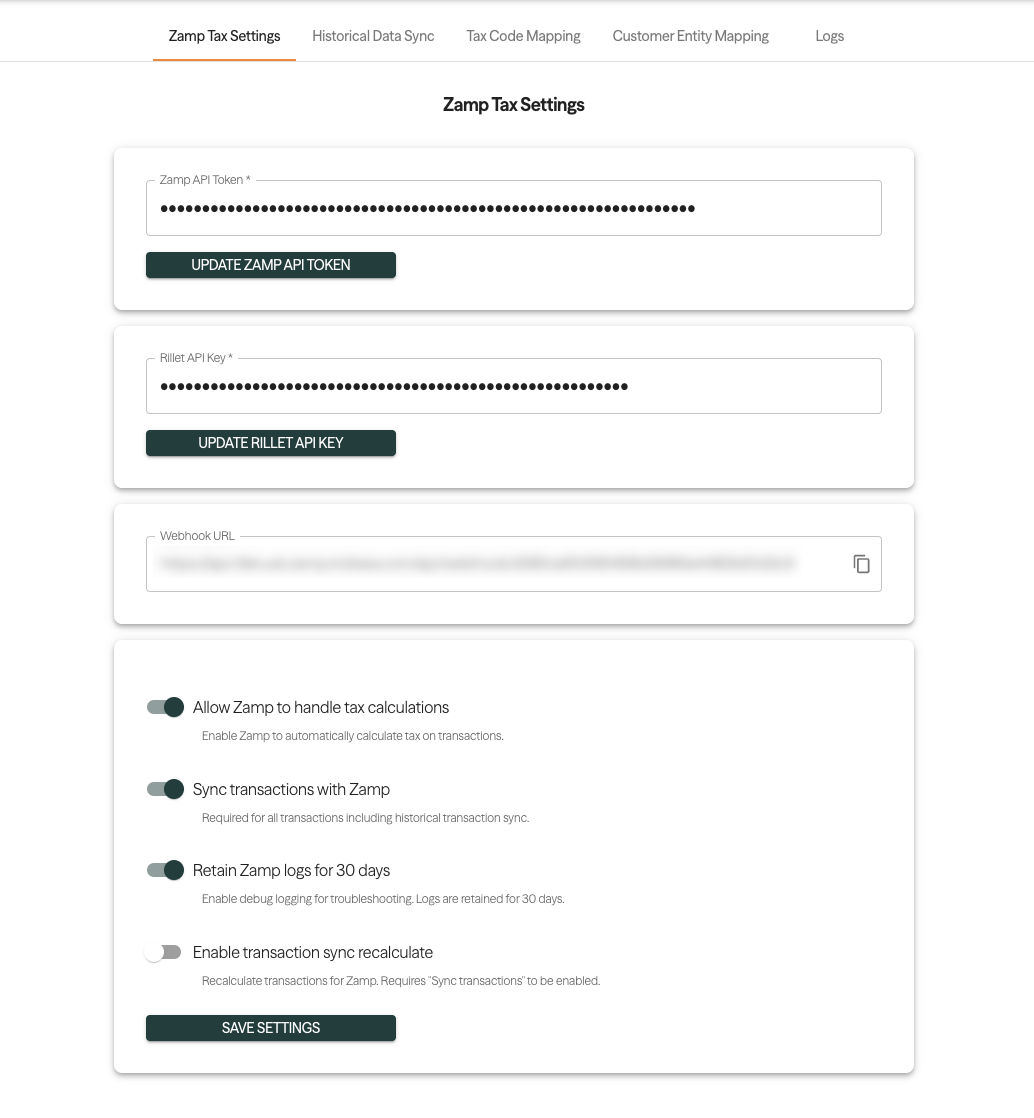
- Enter your Zamp API Token and ensure** **you click Update Zamp API Token
- Enter your Rillet API Key from step 2 and ensure you click Update Rillet API Key
- Copy your Webhook URL
- Enable Allow Zamp to handle tax calculations
- Enable Sync transactions with Zamp
- Enable Retain Zamp logs for 30 days
- (If applicable) Enable** transaction sync recalculate**
This is only necessary if you plan on syncing over data from a previous period and you want Zamp to recalculate tax on those transactions.
4
Creating your Rillet Webhook
- Navigate to Organization settings
- Click Webhooks and Create webhook 1.
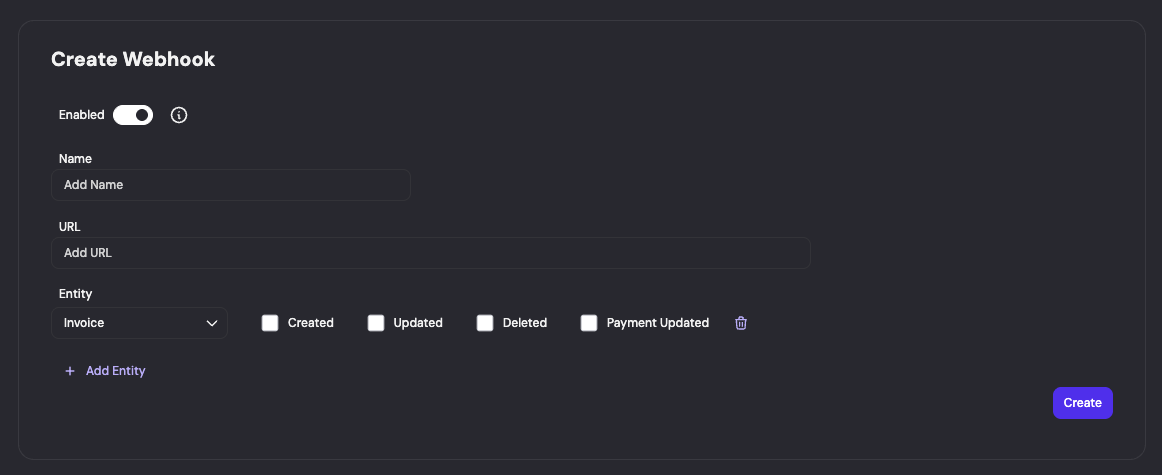
- Name your webhook either Sandbox Zamp Webhook (if testing) or Production Zamp Webhook
- Enter your URL from the Connector
- For the Entity add the Invoice and Credit Memo
- Check Created, Updated, and Deleted
- Click Create
Mapping Products
To accurately calculate tax for your inventory, it is important to map your items to Zamp’s Product Tax Codes. This is all managed within the Zamp Connector. Zamp’s tax codes can be found here, but talk to your Zamp Representative if you have any questions. We are here to assist in evaluating the taxability of your inventory.1
Find your Product List within the Connector
- Navigate to the Zamp Connector
- Click Tax Code Mapping 1.
This is the entirety of your product record and may contain products you are not invoicing to customers. You can ignore those.
2
Map your products (Individual Items)
If you have a small number of products, or wish to update the mapping for an individual product, you can map quickly through a dropdown.
- For the item you wish to map, click the dropdown box denoted by Select tax code
- Within the dropdown, select the Zamp Product Tax Code that should be mapped
- Click Save
3
Map your products (Bulk upload)
If you have a large number of products, you can export your product record from within the connector as an .XLSX file, and re-upload when mapped via Excel (or an adjacent product).
- Click the Export button
- Open the downloaded .XLSX file
- Map Zamp Product Tax Codes in column D, the Zamp Tax Code column 1.
- Save your edits locally
- In the Zamp Connector, click Import
- The connector will tell you whether any Product Tax Codes were invalid or unsuccessfully mapped. Ensure all items you attempted to map are successful before proceeding to save 1.
If you click the buttons next to Status, you can filter for successful, failed, or invalid mappings.
- Click Save
Mapping Exempt Customers
If you make sales to exempt customers, you can tag them with an exemption code directly within the Zamp Connector. Our current list of exemption codes are:1
Find your Customer List within the Connector
- Navigate to the Zamp Connector
- Click Customer Entity Mapping
2
Map your customers (Individual customers)
- For the customer you wish to assign an exemption code to, click the Start typing to select zamp entity box
- Within the dropdown, select the Zamp Exemption Code that should be mapped
- Click Save
3
Map your customers (Bulk customers)
- Click the Export button
- Open the downloaded .XLSX file
- Map Zamp Exemption Codes in column B, the Zamp Entity column 1.
- Save your edits locally
- In the Zamp Connector, click Import
- The connector will tell you whether any Customer Exemptions were invalid or unsuccessfully mapped. Ensure all customers you attempted to map are successful before proceeding to save
- Click Save